Project SYN: Introduction to VHDL Synthesis
This project is a compulsory first part of the examination for the
VLSI
System Design course at the University of Twente. The goals of this
project are:
-
To become familiar with the Synopsys Design Compiler logic synthesis
tool which is able to map a VHDL description at the register-transfer
level (RTL) onto a netlist of cells from a standard-cell library.
-
To gain insight in the area-versus-time tradeoff that can be achieved.
- To receive information on the methodologies for the verification
of the synthesized netlist, viz. post-synthesis simulation and
formal verification.
The description below refers to various file names. These files are not
available on-line. Once you have logged in, execute the command
get-gcd to get them or copy them from
the directory
/home/practice/vlsisd/exercise/modules/gcd.
The Synopsys Logic Synthesis Tools
Synopsys is a major developer of
computer-aided design tools for logic synthesis (and many other tools).
The University of Twente has access to these tools through its membership
of Europractice, an initiative
of the European Union that provides IC design facilities to universities
and research institutes.
The tool that is relevant for this project is the Design Compiler.
It has two user interfaces:
-
A command-line interface. It comes in two versions. The historically oldest
one uses a proprietary Synopsys syntax and is called dc_shell;
the newer one is based on the general-purpose tool-command language Tcl
(pronounce "tickle") and is called dc_shell-t. Tcl
is a language that is supported by an increasing number of VLSI design
automation tools, including the VHDL simulator Modelsim that is also necessary
for this project. dc_shell-t will be used in this project.
-
A graphics interface called design_vision. It has all the possibilities
of the command-line interface as well as menus to perform the various synthesis
steps. It can also draw and display schematics of the synthesized designs.
The tool will only be used in this project to display the synthesized
designs. The actual synthesis will be done in batch mode
by calling dc_shell-t.
The Standard-Cell Library
The cell library that is used in this project, is the 0.35 micron 3.3 Volt
CMOS library of Austria Microsystems. Its data
book is accessible on the Internet. Please consult this information
to understand the components that the synthesizer has put into your design.
The university has access to this library through its Europractice membership.
As a non-disclosure agreement was signed with Europractice, students are
not supposed to disclose any information on this library other than what
is already publicly accessible through the Internet.
Getting Started
The hardware to be synthesized is the GCD machine that was already
used in in project VHD. Many source files
of that project will be reused here.
You should, therefore,
continue to work in the same directory and the same Modelsim project.
New files that should be present in your directory, are (some
explanation follows later on):
- .synopsys_dc.setup: configuration settings for the
Synopsys Design Compiler.
- .synopsys_fm.setup: configuration settings for the
Synopsys tool Formality.
- generte-design: a script to run the required batch-mode
synthesis jobs.
- gcd.xls: an Excel sheet with data on time-area
trade-offs.
Synthesis Setup
A Unix (Bourne/bash)
shell script called generate-design is available
for systematically synthesizing all required designs.
The script first assigns values to a number of shell variables and
then takes these values to perform synthesis.
From the variable settings, an instance name stored in variable
INSTANCE is derived.
The instance name is used in many places:
-
The name of the log file in which the result of each call to
dc_shell-t
is stored. You have to look into this to collect the information on time
and area.
-
The entity name of the synthesized design.
-
The file names of the synthesized designs. Four versions of the synthesized
design are stored in files. First, a hierarchical version in
DB
format. This is an internal
Synopsys database format that can be read by
design_vision; make
use of this possibility to get a feeling of the result obtained. The
next file is a VHDL description of the same design.
The other
two files are flattened versions of the design in DB and VHDL
format. This means that all intermediate hierarchical levels between
the top level and the standard cells are removed. You can use the
hierarchical VHDL version to follow what you see in
design_vision. Do not compile it as this may create some
complications in Modelsim (name conflicts).
The flattened VHDL version can be compiled and configured into the testbench
for post-synthesis verification.
- The name of the SDF file with information on delays in the
netlist.
During the invocation of Synopsys in the shell script many different Synopsys
commands are used. Comments give a short explanation for each of them.
If you need more information:
-
Call dc_shell-t interactively from a terminal, and then give the
command man <command name>.
-
Call /cad/synopsys/sold-2003.09/sold
for the
on-line manuals in PDF (and then select "Design Compiler").
The script generates a log file for each design that has been
synthesized. You have to study this file to collect data on area and
timing. Warnings and error messages generated during synthesis can also
be found in this file. Study them carefully as they contain
information on possible problems with your design.
Exercise SYN-1: Multi-Bit Multiplexer Synthesis
Make sure that the settings in the file generate-design are
correct for synthesizing the design int_mux as given in the
file int-mux.vhd. Note: this design is purely
combinational and does not have a clock signal. As the synthesis
script specifies a clock, a warning in the log file will occur. You
can ignore it.
Run the script. Then study both the log file and the VHDL files produced.
Due to the simplicity of the design, the hierarchical and flattened
netlists are identical.
Which standard cells do you find in the synthesized
design? Check their functionality in the data book.
Exercise SYN-2: Multi-Bit Register Synthesis
Repeat Exercise SYN-1 for the register as given in the file
int-reg.vhd.
You will just need to
comment and uncomment some lines in generate-design before
running the script.
Exercise SYN-3: Synthesis of the GCD rtl Architecture and
Post-Synthesis Simulation
Modify the generate-design script for synthesizing the
rtl architecture of the gcd circuit. For this exercise, it is
sufficient that you synthesize the design for one clock period, say 10
ns. Examine the restulting flattened VHDL netlist. What are the names of the
entity and architecture contained in the file?
Compile the flattened VHDL description. This description
will be called the post-synthesis description of the VHDL.
Before you can
simulate this description, you should create a new configuration of the
testbench that uses your post-synthesis model as the design under
verification.
Simulate the design. Make sure that the SDF file is taken into
account (see the section on gate-level simulations in the
Modelsim
Manual).
If everything went well, the waveforms that
you observe should be (almost) identical to those of the
pre-synthesis simulation. There are some minor differences,
though: there will be a delay between a clock edge and a signal
transition that is supposed to take place at the clock edge.
Show this effect by selecting relevant signals in Modelsim's
Wave window and zooming to the right time scale. Print the
resulting waveform plot. Note: Modelsim's time resolution
should be set to picoseconds to be able to see the effect. In case of
troubles, make sure that the variable 'resolution' (with a lower-case
'r') has value 'ps' in the "mpf" file, the file
that describes your Modelsim project. If you modify this file, you
will need to restart vsim.
Formal Verification with Formality
Formality is a tool that can prove the logic equivalence of two
designs. The first design is called the reference and the
second the implementation. Both designs can be either a
register-transfer level description or a gate-level description.
One of the most common uses of Formality is to check whether the
synthesis to gate level has succeeed. Synthesis fails, for example,
when the user has written non-synthesizable code.
Another application is to
compare two different but equivalent register-transfer level descriptions.
The principle of Formality is to compute a canonical form
(unique representation) of the logic that is needed to obtain the
primary outputs and the "next states" of memory elements. This is
done in both the reference as the implementation designs and then the
corresponding canoncial forms are checked for equality. A first
condition for being able to perform the comparison is that there is a
one-to-one matching of outputs and memory elements in both designs.
In most cases, Formality is able to carry out the matching
automatically using the correspondence in the names used. A user can,
however, also provide a matching if the tool fails.
The next exercise is an introduction to the use of Formality.
Exercise SYN-4: Introduction to Formality
Make sure that the setup file .synopsys_fm.setup is in your
directory (this file e.g. loads information on the standard-cell
library) and then start Formality with the command formality.
A GUI (graphical user interface) will show up, in which you can see
the six steps to be performed sequentially (the final "debug" step is
only necessary when the verification has failed).
- Step 1 is to load and configure the reference design. In the "Read
Design Files" tab, select the "VHDL" subtab, and use the "VHDL" button
to select the VHDL source files belonging to the reference design by
browsing. Continue by clicking on the "Load Files" button. In this
case, the files to be loaded are gcd-ent.vhd and
gcd-rtl-arch.vhd. Finish by selecting gcd as the
top design in the third subtab (it is not necessary to load any DB
file).
- Step 2 is very similar to Step 1, with the difference that
VHDL files related to the implementation design
should be loaded. Load the gate-level VHDL description of your
design and select the top-level entity.
- Step 3 may be necessary to force e.g. some inputs to a constant
value (if a scan-chain has been added to the gate-level circuit, the
scan functionality should be switched off in order to be able to prove
equivalence with the RTL). This step can be skipped for this exercise.
- Step 4 is the matching step (see above). Click on the "Run
Matching" button to actually perform it. In the "Matched Points"
subtab, you will see which matching has been found (there is also
an "Unmatched Points" subtab).
- Step 5 is the actual verification step. Start the verification by
clicking on the "Verify All" button. You will (hopefully) see a
message that the verification has succeeded.
Time-Constrained Synthesis
You have already seen that one of the parameters to be set for logic
synthesis is the clock period. Given a clock period, the synthesis
tool tries to manipulate the longest combinational path (starting and
ending in a register) to fit the given clock period. The supplied
value for the clock period is first reduced to accommodate for the
setup and hold times of the registers.
Such an approach to synthesis is called time-constrained synthesis.
Synopsys operates approximately as follows. It first estimates the
time available for complex functions such as arithmetic operators. It
has a library of alternative implementations for these functions
(think e.g. of different structures for adders; the faster structures
require more hardware). The library is called Design Ware
(DW, the abbreviation shows up in the hierarchical VHDL that is
generated by Synopsys). After having composed all necessary logic with
cells from the target standard-cell library, it checks whether the
timing constraints are met. If this is the case, it stops. If the
constraints are violated, it starts manipulating the logic in order to
shorten the critical paths. This results in more area in general. This
type of manipulation of the logic is an iterative process. It stops
either as soon as the timing constraints have been met or when
Synopsys judges that all possibilities to decrease the critical paths
have been exhausted.
The log files contain the outputs of the Synopsys
report_reference (the cells used, their areas and the total
area) and report_timing (critical path) commands. The term
slack refers to difference between the critical-path length
and the timing constraint. A negative slack means that the timing
constraints have not been met. Because Synopsys tries all kind of
transformations and then gives up when it does not find a solution,
the area figures reported then are not reliable. They should not be
taken into account in the analyses.
In order to explore the design space for a single VHDL description of
some circuit, one can synthesize it for different clock periods and
then collect the time-area pairs reported by Synopsys (and recorded in
the log file by the script generate-design). Solutions for
which the timing constraint was not met, should be ignored.
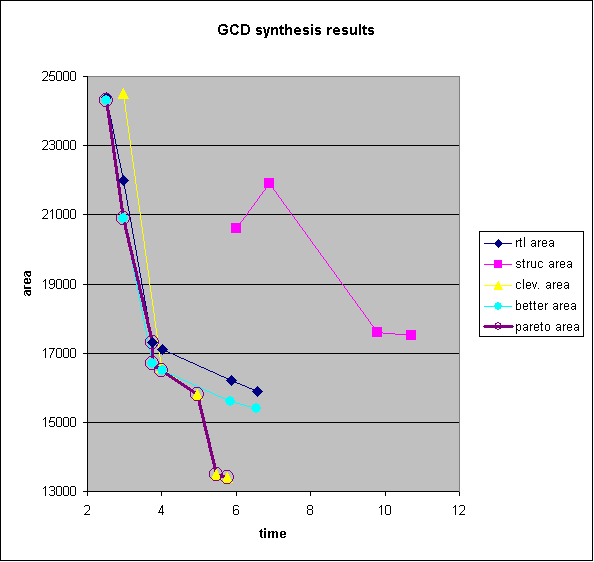
Time-Area Trade-Off for GCD
The procedure just mentioned has been applied to the two architectures
of the GCD circuit: rtl and structure.
The time-area pairs that are meaningful, have been
collected in the table below.
There are a few points to take into account:
-
If the same solution is found for
multiple consecutive constraints, only the smallest constraint leading
to the solution is mentioned in the table. That is the reason why not
all constraint values are mentioned, even when the constraint was
increased in unit time steps when the synthesis procedure was run.
-
The time figures reported have been obtained by subtracting the slack
from the time constraint. In the case of the architecture
structure the time figures have been multiplied by two, as
this solution needs two clock cycles for the main loop body consisting
of a comparison and a subtraction.
| architecture rtl
|
|
architecture structure
|
| constraint |
rtl time | rtl
area |
| constraint | struc
time | struc area |
| 2.5 | 2.5 | 24400 |
|
|
|
|
| 3 | 3.0 | 22000 |
| 3 | 6.0 | 20600 |
| 4 | 3.7 | 17300 |
| 4 | 6.9 | 21900 |
| 5 | 4.0 | 17100 |
| 5 | 9.8 | 17600 |
| 6 | 5.9 | 16200 |
| 6 | 10.7 | 17500 |
| 7 | 6.6 | 15900 |
|
|
|
|
Pareto Optimality
Each solution to the design problem that is considered here, has two
figures of merit to be minimized:
time and area. Such a solution will be denoted by
(t, a). By varying either the input VHDL architecture or the clock
period constraint, one gets different solutions. Because of the two
figures of merit, it is not possible to decide which of the solutions
is the best one. However, it is possible to make a statement about one
solution being inferior to another one. A solution (t1, a1) is said
to be inferior to (t2, a2) if t1 is larger than t2 and a1 is larger than
a2.
A solution that is not inferior to any other solution in the solution
set is called to be Pareto optimal. There may be multiple
solutions that are Pareto optimal in a solution set.
The contents of the table above have been used for a time-area plot
shown in the figure below. The figure also contains plots for two
other solutions called better and clever. The VHDL
code belonging to these solutions is not disclosed to you. Finally,
the Pareto points of all solutions have been indicated in the figure.
Exercise SYN-5: Alternative GCD Architecture
-
Try to identify a point of improvement in the given rtl
architecture of GCD (study e.g. the log files and the hierarchical
post-synthesis VHDL description to identify the type of arithmetic
blocks instantiated).
- Make a new architecture (copy the original one
and rename the architecture) that implements the improvement. Motivate
your design choice. The new architecture should obey the restriction
that it has a behavioral description and not a structural one (you are
not allowed to create new entities and instantiate them).
- Verify that your pre-synthesis VHDL functions correctly.
- Synthesize it
first for one clock period and then simulate the post-synthesis VHDL.
- If no problems are encountered, synthesize it for relevant
clock-period values (not necessarily integer)
from 2 ns to 10 ns and extract the relevant time-area pairs for each
constraint.
- Add these data to the Excel sheet gcd.xls and superimpose
the time-area plot included in the Excel sheet.
- Does your solution result in new Pareto-optimal solutions?
Note: If you do not succeed to find an architecture that
improves the design, just take an architecture that is different
than the one provided.
Deliverables
Prepare a short report that contains:
- a few sentences on Exercises SYN-1 and SYN-2;
- the VHDL source for the configuration of Exercise SYN-3, as well
as the requested waveform plot;
- the VHDL source for the architecture designed for Exercise SYN-5
as well as the motivation for the design choices made;
- relevant parts of the Formality's trancript file (File
→ Save Transcript), showing that you have verified the
synthesized gate-level against the RTL source in Exercise SYN-5;
- the VHDL sources for the configurations that you need to perform
the pre-synsthesis and post-synthesis simulations of Exercise SYN-5;
- the time-area pairs and their plot for the architecture of Exercise SYN-5.
Last update on:
Mon Feb 16 17:41:11 CET 2004
by
Sabih
Gerez.